
News

WPC Installation Failures: 7 Critical Errors Architects & Contractors Must Avoid

2026-08-14 0 Leave me a message
WPC Installation Failures: 7 Critical Errors & How to Avoid Them | Necowood
🛠️ Professional Installation Guide

WPC Installation Failures: 7 Critical Errors Architects & Contractors Must Avoid

85% of WPC facade failures trace to installation errors — not material defects. This guide covers the physics of WPC thermal expansion, repair decision trees, and regional building codes.

"A $200,000 WPC facade replacement — because the contractor didn't know the difference between thermal and hygroscopic expansion."

— Forensic building report, Singapore, 2025

The global Wood Plastic Composite market is projected to reach $9.67 billion in 2026[1]. Yet industry data suggests that up to 85% of WPC facade failures trace back to installation errors — not material defects[2].

For architects and contractors, each failure represents not just reputational damage but direct financial loss: re-cladding a commercial facade can cost $50,000–$200,000 depending on project scale. The Singapore case above — 37% of WPC panels failed within 18 months due to inadequate expansion gaps — is not an isolated incident.

This guide is structured for architects, specifiers, and experienced contractors. It covers the physics of why WPC fails, a decision-tree approach to repairs, and region-specific building codes across the US, Europe, Australia, and Singapore.

85% of WPC failures traced to installation errors — not material defects[2]
$50k–200k cost to re-clad a commercial facade after installation failure
3.5×10⁻⁵ WPC coefficient of thermal expansion (CTE) per °C[3]
25mm minimum rainscreen cavity required for exterior cladding[2]

Why WPC Moves Differently Than Wood

The Physics of Failure

WPC is a composite of wood fiber (30-60%) and thermoplastic polymer (40-70%). The polymer matrix — typically HDPE or PP — has a coefficient of thermal expansion (CTE) approximately 3-5 times higher than wood[3].

CTE Comparison (×10⁻⁵/°C):
Wood (parallel to grain): 0.5
WPC (typical): 3.5 (range: 2.5–4.5)
Aluminum: 2.3
PVC: 5.0–7.0
Steel: 1.2

While wood primarily expands across its width due to moisture absorption (hygroscopic expansion), WPC expands linearly along its length due to temperature change (thermal expansion)[2].

This fundamental difference — hygroscopic vs. thermal — is the root cause of most installation failures. Architects must treat WPC installation more like aluminum cladding (CTE ≈ 2.3×10⁻⁵/°C) than timber (CTE ≈ 0.5×10⁻⁵/°C).

Expansion Gap Calculation Formula:

Gap = CTE × L × ΔT + Safety Factor
• CTE = 3.5×10⁻⁵/°C (WPC typical)
• L = panel length (mm)
• ΔT = temperature swing (°C)
• Safety Factor = 2mm (minimum)

Example: For a 4m panel in a 30°C temperature swing:
Expansion = 3.5×10⁻⁵ × 4000mm × 30 = 4.2mm
Add 2mm safety factor = 6.2mm minimum gap.

This is why the industry standard recommendation of 6-8mm side gaps and 10-12mm perimeter gaps is not arbitrary — it's physics[5].

Error Severity Framework

The seven errors below are organized by their impact on building safety, structural integrity, and long-term performance.

🔴 Fatal Structural failure — requires complete rebuild
🟠 Serious Functional impairment — reduces lifespan and performance
🟡 Important Detail oversight — affects aesthetics and maintenance
1 Ignoring Thermal Expansion Gaps FATAL
WPC decking buckling due to insufficient expansion gaps — thermal stress failure
Inadequate expansion gaps cause WPC panels to buckle, warp, and crack under thermal stress.

The Mistake: Fitting WPC boards tightly against walls, posts, or each other without leaving clearance[4].

⚙️ Why This Is a Mistake: As calculated above, a 4m WPC panel expands 4.2mm in a 30°C swing. Without gaps, the panel has nowhere to go and will buckle, warp, or crack[4].

"If your contractor pinned the boards too tightly, the summer heat will cause them to buckle."[4]

— Sundi WPC, 2026 Installation Guide

Real-world cost: A Singapore commercial project installed WPC wall panels without expansion gaps. Within three months, 37% of panels showed visible buckling. The contractor was forced to remove and reinstall the entire facade at a cost of $72,000.

🌳 Repair Decision Tree:
Gap < 3mm: 🔴 Full replacement required — panels have already suffered internal stress damage
Gap 3–5mm: 🟠 Short-term repair — relief cuts recommended; long-term replacement planning required
Gap ≥ 5mm: 🟢 Local repair possible — monitor for further movement
🌍 Regional Installation Standards:
🇺🇸 US: ASTM D7032 — Standard Specification for WPC Decking
🇪🇺 EU: EN 15534 — Wood-Plastic Composites Specifications
🇦🇺 Australia: AS/NZS 4702 — WPC Installation Standards
🇸🇬 Singapore: BCA Green Mark — Cladding Systems Requirements

The Fix:

Expansion Gap Specifications:
Side gaps between adjacent panels: 6-8mm[5]
Perimeter gaps at walls, columns, and fixed obstacles: 10-12mm[5]
Temperature adjustment: Install at lower gap values in hot conditions, higher values in cold conditions[5]
Use calibrated spacer tools designed specifically for WPC panel installations[5]
🔗 View Necowood ASA Wall Cladding — each panel comes with CTE-tested specifications and recommended gap tables.

Reference standard: ASTM D6341 — Standard Test Method for Determination of the Linear Coefficient of Thermal Expansion of Plastic Lumber.
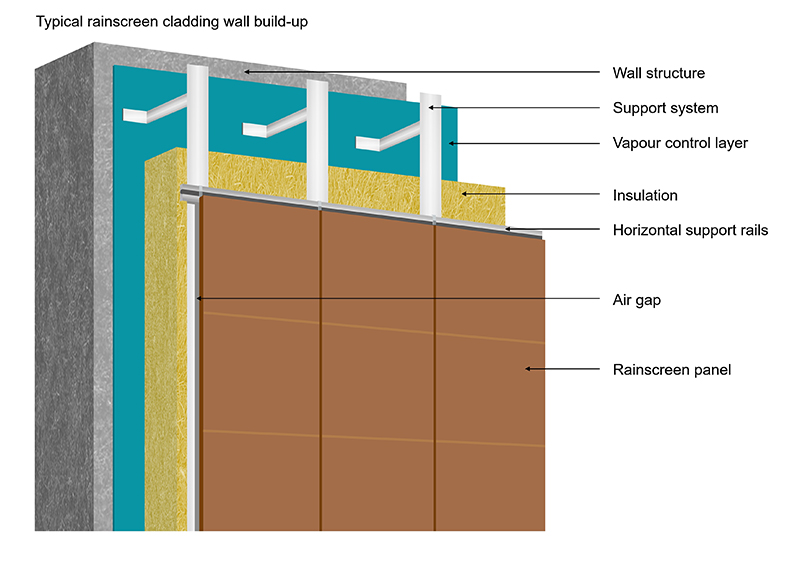
2 No Rainscreen Cavity — Flush-Mounting Exterior Panels FATAL
Rainscreen cavity installation showing ventilation gap between cladding and wall
A ventilated rainscreen cavity (minimum 25mm) is essential for drainage and thermal performance.

The Mistake: Mounting WPC exterior panels flush against the building's weather-resistant barrier (WRB)[2].

⚙️ Why This Is a Mistake: This rigid, zero-clearance installation traps both liquid water and intense solar heat, leading to premature material degradation and potential rot in the building's structural framing[2].

"A common and catastrophic mistake in modern construction is mounting composite exterior panels flush against the building's weather-resistant barrier."[2]

— Ecotech WPC Industry Solutions, 2026

Real-world cost: A Melbourne apartment project mounted WPC cladding directly onto OSB sheathing without a rainscreen cavity. After 18 months, trapped moisture caused extensive wood frame rot. The remediation cost exceeded $340,000.

🌳 Repair Decision Tree:
Cavity < 10mm: 🔴 Full facade replacement — structural damage to framing likely
Cavity 10–20mm: 🟠 Ventilation retrofit — install additional battens to create minimum 25mm gap
Cavity ≥ 25mm: 🟢 No action required — monitor drainage channels annually
🌍 Regional Building Code References:
🇺🇸 US: IBC Chapter 14 — Exterior Walls (ventilated cavity required)
🇪🇺 EU: EN 15534 — Ventilated facade systems
🇦🇺 Australia: AS/NZS 4284 — Weathertightness of Building Facades
🇸🇬 Singapore: BCA Approved Cladding Systems — mandatory cavity for high-rise

The Fix:

Rainscreen Cavity Specifications:
Minimum continuous air cavity: 25mm (1 inch)[2]
Commercial facade projects: 25-40mm[6]
Cavity functions:Capillary break — drains penetrating moisture; ② Convective thermal draft — vents hot air and reduces surface temperature[2]
🔗 Download Necowood's Rainscreen Cavity Detail Drawings — CAD-compliant cavity specifications for US, EU, and AU markets.

Reference standards: BS 8414 (external wall fire performance), ASTM E2273 (wall drainage efficiency).
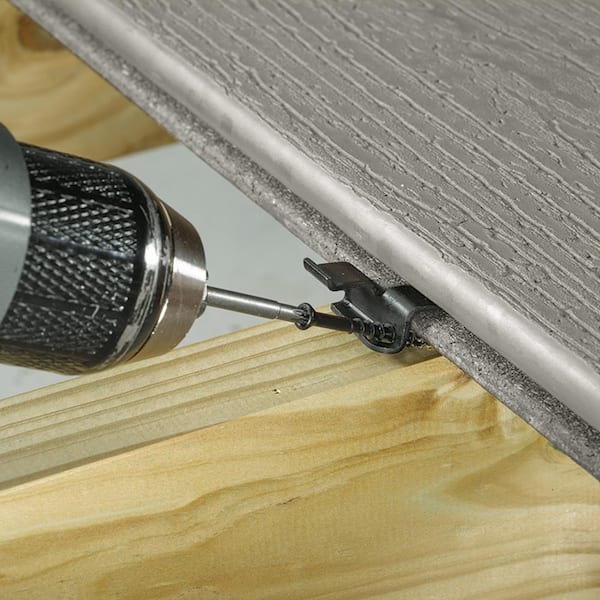
3 Face-Screwing Instead of Using Hidden Clips SERIOUS
Hidden clip fastening system for WPC allowing thermal expansion
Hidden clip systems allow panels to slide freely — face-screwing locks them in place and guarantees failure.

The Mistake: Driving screws directly through the face of the WPC board[2].

⚙️ Why This Is a Mistake: Face-screwing locks the panel in place, preventing thermal expansion movement[2]. As the panel attempts to expand, internal stress builds until it forces the board to buckle or shear the screw heads[7].

🌳 Repair Decision Tree:
Face-screwed entire facade: 🔴 Full replacement — screws cannot be removed without damaging panels
Face-screwed isolated areas: 🟠 Localized replacement — replace affected panels with clip system
Mix of clips and screws: 🟡 Partial retrofit — remove screws from sliding areas, leave only fixed center-pins

The Fix:

Fastening Protocol:
Never screw directly through the panel face[2]
Always use manufacturer-approved hidden sliding clip systems[2]
Clip performance: Clips allow 8-12mm of longitudinal movement while securing against wind loads
One fixed center-pin is permitted to control directional movement; all other fixings must allow sliding
🔗 Necowood's 360° Shield™ Wall Cladding includes an integrated hidden clip system with 12mm movement capacity — verified to ASTM E330.

Reference standard: ASTM E330 — Structural Performance of Exterior Curtain Walls.
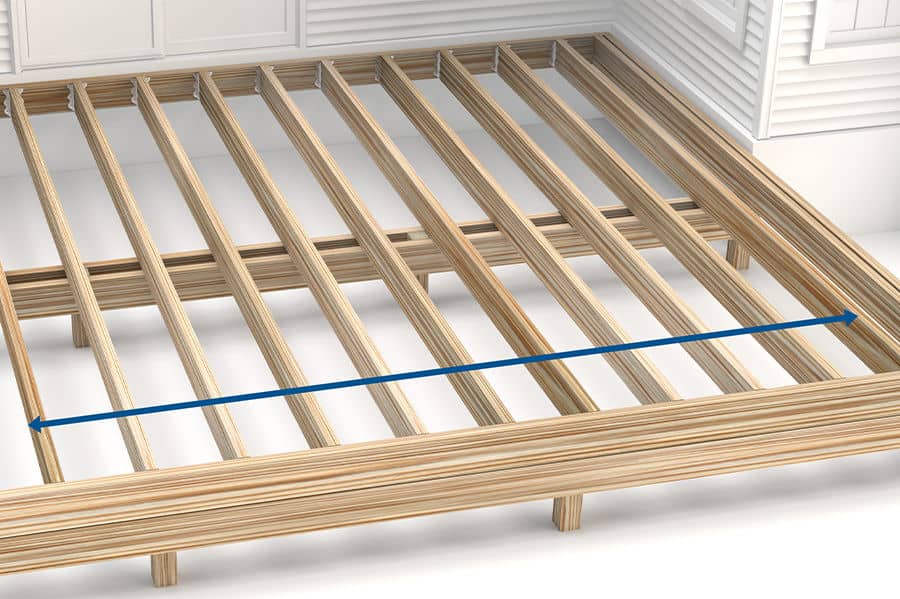
4 Joist Spacing Too Wide SERIOUS
WPC decking with proper joist spacing showing structural integrity
Proper joist spacing (400-500mm) ensures structural integrity and prevents sagging under load.

The Mistake: Increasing joist spacing beyond the manufacturer's recommendation[8].

⚙️ Why This Is a Mistake: Over-spaced joists overload the decking boards, causing them to sag, warp, and deflect over time[8].

🌳 Repair Decision Tree:
Spacing > 600mm: 🔴 Full substructure replacement — panels are permanently damaged
Spacing 500–600mm: 🟠 Add intermediate joists — may require panel removal
Spacing ≤ 500mm: 🟢 No action required — verify with load calculations

The Fix:

Joist Spacing Specifications:
Standard applications: 400-500mm[10]
High-wind zones / commercial: 300-400mm[11]
Never exceed manufacturer's specified maximum spacing[8]
5 Skipping Panel Acclimation SERIOUS
WPC panels stacked flat for acclimation before installation
Acclimating WPC panels for 24-48 hours prevents post-installation expansion and joint failure.

The Mistake: Installing WPC panels immediately upon delivery[3].

⚙️ Why This Is a Mistake: WPC panels absorb or release moisture during transport, causing dimensional changes[3].

The Fix:

Acclimation Protocol:
Time: 24-48 hours minimum[3]
Location: In the installation room, not in the warehouse[3]
Packaging: Unpack all panels[3]
Stacking: Stack flat to prevent warping[3]
6 Not Pre-Drilling Fastener Holes IMPORTANT

The Mistake: Driving screws directly into WPC without pre-drilling[4].

⚙️ Why This Is a Mistake: WPC is significantly denser than softwood[4]. Driving screws without pre-drilling causes splitting or mushrooming, leading to cracks over time[4].

The Fix:

Pre-Drilling Specifications:
Always pre-drill pilot holes[4]
Drill bit size: Slightly smaller than screw diameter[4]
Minimum hole size: 3mm[15]
7 Using the Wrong Fasteners IMPORTANT

The Mistake: Using galvanized or zinc-plated screws[4].

⚙️ Why This Is a Mistake: Standard screws will rust and fail within a year[4].

🌍 Regional Fastener Requirements:
🇺🇸 US: ASTM B117 — Salt Spray Testing (minimum 1,000 hours)
🇪🇺 EU: EN ISO 9227 — Corrosion Resistance Standards
🇦🇺 Australia: AS 3566 — Self-Drilling Screws for Steel
🇸🇬 Singapore: SS 213 — Stainless Steel Fasteners Specification

The Fix:

Fastener Specifications:
Exterior: 304 or 316 Stainless Steel[4]
Coastal / high-salt: 316 Stainless Steel required[16]
🔗 Download Necowood's Full Fastener Specification Guide — includes material grades, torque settings, and salt spray test reports.

Pre-Installation Field Checklist

Before starting any WPC installation, verify these seven items. Most installation challenges can be avoided with proper planning and execution[15].

Expansion gaps calculated (6-8mm side, 10-12mm perimeter)
Rainscreen cavity ≥25mm (exterior installations only)
Hidden clip system selected — not face screws
Joist spacing confirmed (400-500mm standard, 300-400mm high-wind)
Panels acclimated 24-48 hours on-site
Pre-drilling protocol confirmed for all fixings
304/316 stainless steel fasteners only

Why Proper Installation Matters — The Necowood Difference

Necowood WPC manufacturing facility and quality control laboratory
Necowood's 16+ years of manufacturing experience ensures consistent quality and installation-ready specifications.

At Necowood, we design our WPC wall panels and cladding systems with installation performance in mind. Every panel is engineered with consistent profile tolerances, clip compatibility, and batch color control to ensure on-site success.

With 16+ years of WPC manufacturing experience and exports to 35+ countries, Necowood provides:

  • Detailed installation manuals — clear guidance on expansion gaps, batten spacing, and fastening protocols for every climate zone
  • Technical support — on-call assistance for contractors and architects during the installation phase
  • Factory-verified quality — every batch tested for dimensional stability, surface hardness, and co-extrusion integrity
  • 15-year structural warranty — proper installation is the foundation of our warranty protection
  • Compliance documentation — full test reports for thermal expansion, wind load, and fire safety to support project approvals

As the WPC market continues to evolve — projected to reach $14.54 billion by 2031 at 8.49% CAGR — manufacturers that combine material quality with installation support will lead the industry. Necowood is committed to being that partner — delivering products that perform not just in the lab, but on the wall.

Related News
Leave me a message
X
We use cookies to offer you a better browsing experience, analyze site traffic and personalize content. By using this site, you agree to our use of cookies.Privacy Policy
RejectAccept